Learn the Design, Construction and Maintenance Considerations of Ornamental Gardens
Every site has a unique set of micro climatic and soil conditions. Other factors such as the site’s exposure to traffic, pests and disease, will also be unique.
All of these things are relatively uncontrollable; although the way the landscape is designed will impact on these characteristics as well.
Examples:
- Planting large plants can modify existing microclimates by buffering temperature fluctuations, changing light intensities etc.
- Changing contours can alter soil temperatures, soil moisture, exposure to light, as well as drainage patterns, etc.
- Treatments of surfaces can change drainage characteristics, soil conditions,
- Buildings, drainage pipes, services (electricity, gas etc)can be affected by the nature and type of landscape treatment
Some styles of landscape are going to cause greater changes to a landscape than others.
COURSE STRUCTURE AND CONTENT
Course Duration: 100 hours.
Start Date: Start at any time - study at a pace that suits you, and with full tutor support for the duration of your studies.
Lessons: The course comprises 10 lessons as detailed, below.
- Site Appraisal, Interpretation and Risk Assessment
- Preparing Site Plans and Specification
- Influence of Site Characteristics
- The Use of Hard Landscape Features
- Setting out a Site to Scale Plans and Drawings
- Soil Handling and Storage
- Land Drainage Systems
- Ground Preparation Techniques
- Construction of Paths and Patios
- Construction of Steps, Ramps, Dwarf Walls and Fences
COURSE AIMS
-
Explain how to conduct a site appraisal and interpret the results.
-
Conduct risk assessments associated with planning layout and construction of ornamental gardens
-
Produce and interpret site plans and specifications using basic survey measurements.
-
Explain how site characteristics may influence choice of garden design style.
-
Evaluate and explain the contribution made by hard landscape features to design and function
-
Describe the practical procedures for setting out a site to scale plans and drawings.
-
Describe and explain the reasons for correct soil moving and storage during construction works.
-
Explain the factors which determine the design and specification of land drainage systems and describe procedures for setting out and installing land drainage.
-
Explain requirements for a range of ground preparation techniques for different landscape features.
-
Specify a range of materials and outline procedures for construction of paths and patios.
-
Specify a range of materials and outline procedures for construction of Steps, Ramps, Dwarf Walls and Fences.

LANDSCAPING SHOULD BE PLANNED
Planning is always the first step towards a successful garden. This is much easier when developing a new garden from scratch, because you don't have the problem of choosing what parts of the old garden will remain and what will be scrapped. Redeveloping an old garden should nevertheless still be planned.
If renovating an existing garden, don't be afraid to be ruthless. Don't hesitate to change the shape of paths and garden beds or rip up lawn areas completely. You will paint the best picture, and the one that best suits you, on a clean canvas
STEPS IN DESIGNING YOUR GARDEN
Once you have determined the type of garden you want, and what the primary uses of that garden will be, you can begin the design. A step-by-step approach, working the plan out on paper, is the best starting point.
FIRST Measure up and Draw the Area
 You need a basic plan of the site as it now exists showing boundaries, fences, buildings (with the position of doors and windows), and any permanent features such as concrete paths, sheds or washing lines. You should also determine where services enter and cross the property and where drainage lines and pipes are located. All items included on the base plan must be drawn to scale and measured for placement. For instance, if a separate shed or tree is included on the design, then it must be measured not only for size, but also for distance from the property lines and located appropriately on the plan. Include all plants and features that you intend to keep in the landscape, but there is no need to keep details of those things that will be removed or changed. Items that need to be kept clear or accessible, such as power lines and water taps, should be included, as well as features that may need to be hidden, such as meter boxes.
This is known as the base plan and will be an important tool throughout the planning process. It must be very accurate, both in detail of the size and placement of plants and buildings and in the features of the property, such as north facing, etc. The base plan is a time consuming project, but it is time well spent in creating a successful design. An accurate base plan will tell you exactly how much space you have to work with.
NEXT Research the Property
It is important to check with your local council before making any decisions about your landscape design. They may have restrictions on things such as what trees can be removed, the construction of decks and features, and drainage requirements. Other information you may want to research is general weather conditions for the area (e.g. how much rain and when does it usually fall, prevailing winds, likelihood of frosts, etc.), soil type and characteristics (such as the pH which is a measure of the alkalinity or acidity of the soil), drainage patterns, and location of underground services. These will play a role in the placement of plants and other features.
AFTER THAT Determine Features of the property
Overlay a sheet of tracing or thin paper over the base plan and use it to identify the physical and natural factors of the property. Include things such as an indication (e.g. arrows) of prevailing winds, desirable and undesirable views, surrounding roads, houses and overhanging trees which affect the property. Note things such as where you would like wind and sun blocked, views and areas that you want to hide and views that you want to keep. This will influence where you place areas of use and plants in your landscape.
This is the start of the creative phase of the landscape design and should be treated as such. Scale is not important, rather taking advantage of what is naturally occurring in your neighbourhood and remedying those things that are unsightly or annoying is the purpose of this exercise.
THEN You can Develop a Concept Plan
This is a series of "bubbles" or circles, drawn on a sheet of paper overlaying the base plan and the features plan, creating a third layer. The purpose of the concept plan is to identify what each area of the property will be used for. The needs you identified should be incorporated here, as well as the physical aspects of the property noted in steps 2 and 3 of the design process.
The concept plan is an important step as it identifies boundaries. It does not need to be to exact scale, but should be proportional. Draw on your sketch plans what the purpose of each area is and what the intended style of that area is to be (e.g. "outdoor living area/cottage garden style" or "aesthetic area/formal rose garden style").
You should draw several concept plans before you decide on the final use of the property. Remember, it is easier and far cheaper to make changes on paper, so take your time on this phase. Be creative and try using a number of different approaches before settling on your final concept plan.
Draw in the Physical Details for each Area
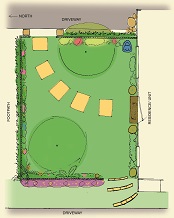
Using a fourth sheet of overlay, this is where you begin your final design detail. Decide on the size and shape of garden beds, paths and paved areas, then determine where you might locate any gazebos, pergolas, ponds, statues or other garden features. Also include any existing features that are to be retained. This should be drawn to scale and meet all the requirements set down on the concept plan.

LASTLY YOU CAN CREATE The Final Plan
This can be drawn directly on a copy of the original base plan and must be drawn to scale. The final plan will include the size and shape of all garden beds and areas on the property. It should specify exactly what will be included in the garden and where. The plants and materials to be used should be included here, either directly on the plan or listed on a separate sheet as a key to the actual plan. The final plan will act not only as a guide for setting out the landscape, but also as a shopping list for materials and plants needed, so it must be very specific.
The final plan then becomes your working paper. But don't let the amount of work overwhelm you. A garden can be a long term project over many years, with the plan being a constant guide. A well planned garden will eventually accommodate everything on your list of needs and wants, and can be changed, but basically should remain the same. But, as a garden is an evolutionary process, it should still be aesthetically pleasing and functional.
HOW THE COURSE WORKS
You can start the course at any time.
It is studied by distance learning, so you can study in the comfort of your own home. But this doesn't mean you are all alone in your studies. Our highly qualified and friendly tutors are there to help you every step of the way. If you have any questions at all, they are always happy to help.
THE ADVANTAGES OF STUDYING WITH ACS
- You can start the course at any time and study at your own pace.
- Fit your studies around your own busy lifestyle - we provide full tutor support for all the time you are studying.
- Study where you want to - online studies offer the flexibility for you to determine where and when you study.
WHAT NEXT?
Enrol
Go to “It’s Easy to Enrol” box at the top of the page and enrol now.
Get Advice
Email us at info@acsedu.co.uk or use our FREE COUNSELLING SERVICE to contact a tutor.